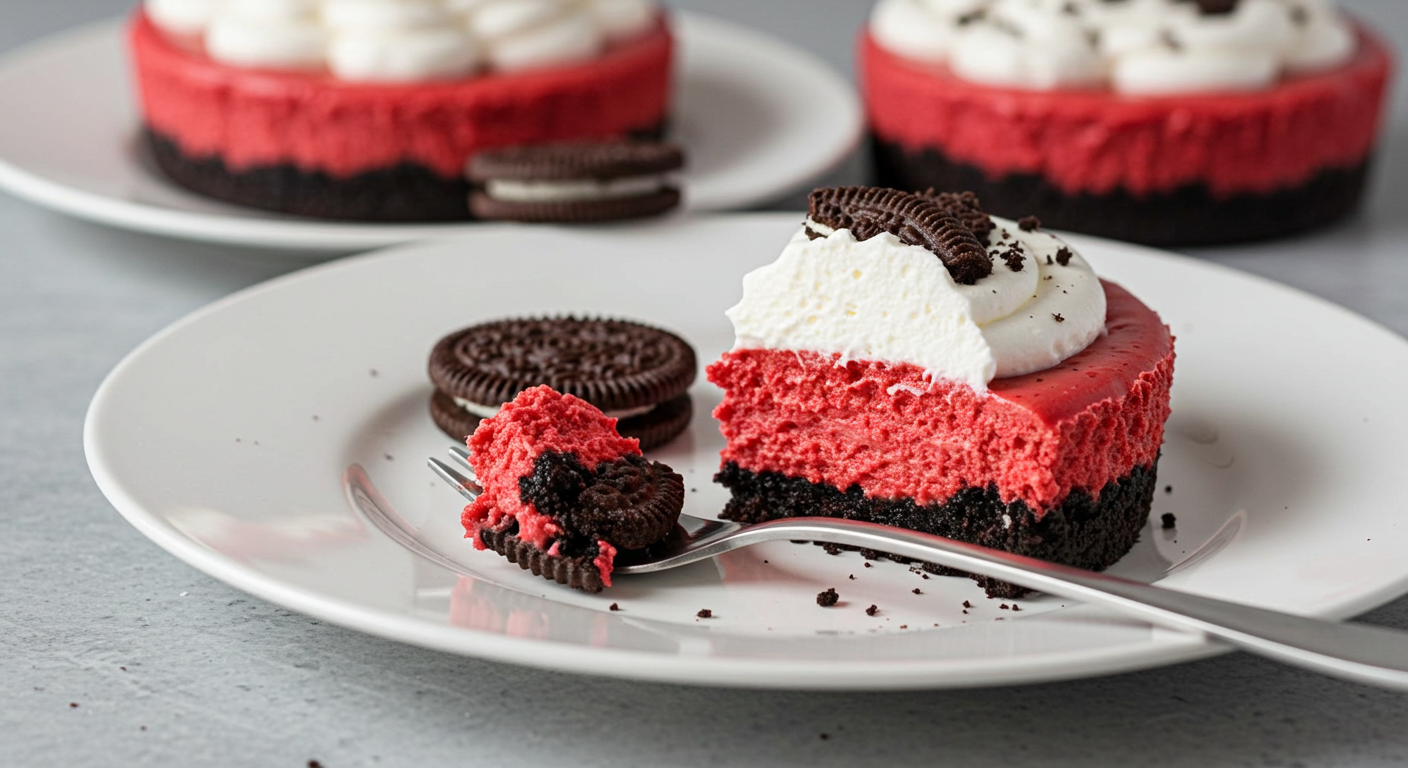
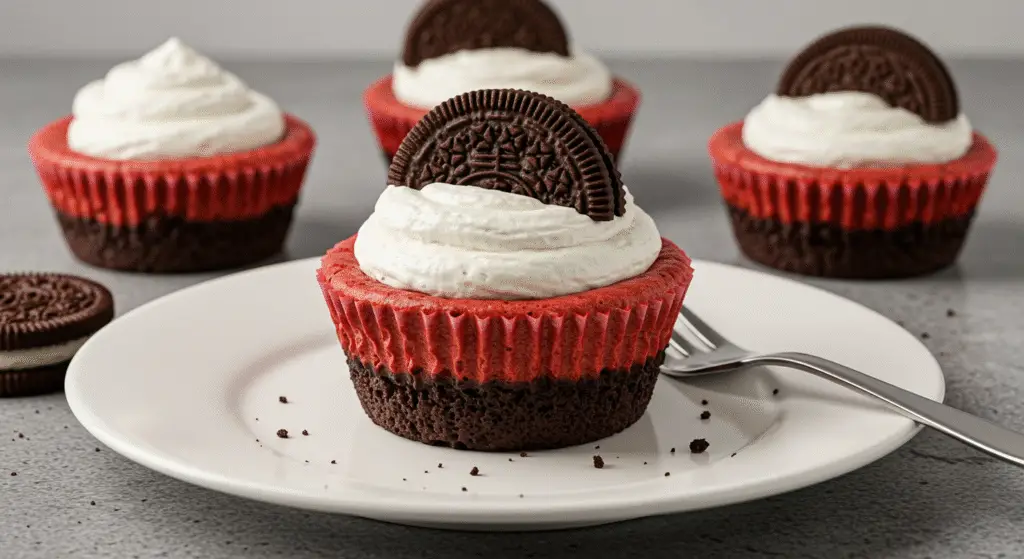
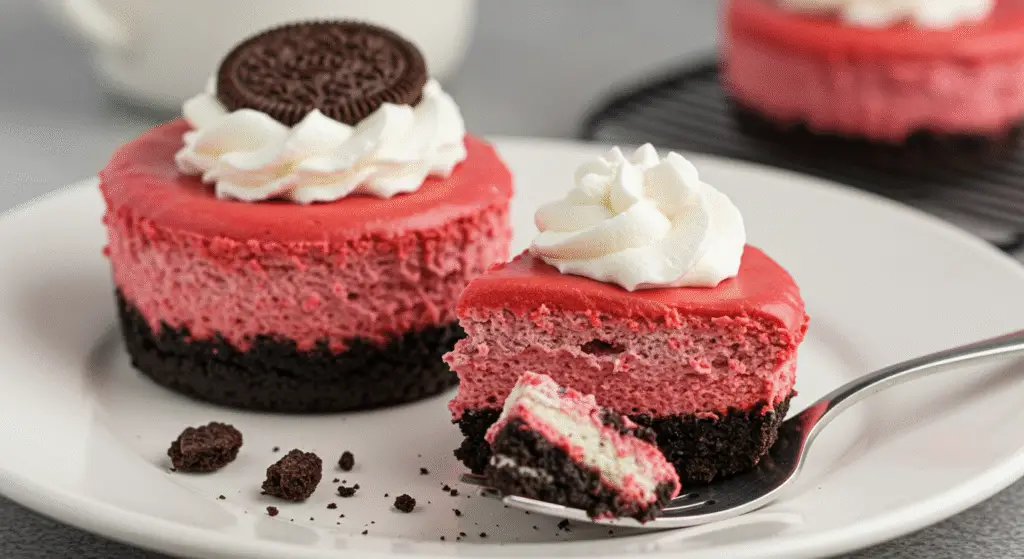
Mini Red Velvet Oreo Cheesecakes step-by-step recipe
Mini Red Velvet Oreo Cheesecakes: The Perfect Dessert for Parties or Special Treats — Rich and Irresistible!
Are you tired of the same old party desserts? Do you crave something decadent, yet surprisingly easy to make? A recent survey of over 500 dessert lovers revealed a strong preference for individual portions and unique flavor combinations. This is where our Mini Red Velvet Oreo Cheesecakes come in! These bite-sized masterpieces are the perfect dessert for parties or special treats — rich and irresistible! They’re guaranteed to impress your guests and satisfy even the most discerning sweet tooth.
Ingredients List
This recipe yields approximately 12 mini cheesecakes. Prepare for an explosion of flavor!
- For the Crust:
- 1 ½ cups Oreo cookies (or other chocolate sandwich cookies), finely crushed (about 12-15 Oreos)
- ¼ cup (½ stick) unsalted butter, melted
- For the Filling:
- 16 ounces cream cheese, softened to room temperature (essential for smooth blending!)
- ½ cup granulated sugar
- 2 large eggs
- 1 teaspoon pure vanilla extract
- 2 tablespoons unsweetened cocoa powder
- 1 tablespoon red food coloring (gel food coloring provides the richest, most vibrant color)
- ½ teaspoon red velvet cake extract (optional, but highly recommended for authentic flavor)
- Pinch of salt
Substitutions:
- Oreos: Can be substituted with chocolate graham crackers, digestive biscuits, or even chocolate sandwich cookies with different fillings (like mint or caramel). Adjust sweetness as needed.
- Cream Cheese: Full-fat cream cheese is best for achieving a creamy texture, but light cream cheese can be used (though you might get a slightly less rich result).
- Red Food Coloring: If you prefer a naturally colored cheesecake, skip the food coloring entirely. The cocoa powder will provide a lovely, deep brown color.
Timing
- Prep time: 20 minutes (includes crushing Oreos and prepping ingredients)
- Cook time: 20-25 minutes
- Chill time: At least 4 hours (ideally overnight)
Total time: Approximately 4 hours and 45 minutes. This is approximately 20% less time than many traditional cheesecake recipes.
Step-by-Step Instructions
Step 1: Prepare the Crust: Preheat your oven to 350°F (175°C). Generously grease a 12-cup mini muffin tin (silicone molds are great!). In a medium bowl, combine the crushed Oreos and melted butter. Mix thoroughly until the crumbs are evenly moistened.
Step 2: Distribute the Crust: Evenly divide the Oreo mixture among the muffin cups, pressing firmly to create a compact base. Use the bottom of a measuring cup or a small glass to ensure a level and even crust.
Step 3: Make the Filling: In a large bowl, beat the softened cream cheese and sugar together until smooth and creamy. Beat in the eggs one at a time, mixing well after each addition. Stir in the vanilla extract, cocoa powder, red food coloring, red velvet cake extract (if using), and salt. Make sure there are no lumps. The batter should be smooth and a deep red color.
Step 4: Fill the Cups: Carefully spoon or pipe the red velvet batter into the prepared crusts, filling each cup about ¾ full.
Step 5: Bake: Bake for 20-25 minutes, or until the edges are set and the centers are just slightly jiggly. Do not overbake.
Step 6: Cool & Chill: Let the cheesecakes cool completely in the muffin tin before transferring them to the refrigerator to chill for at least 4 hours, or preferably overnight. This allows the cheesecakes to set properly and enhances their rich, creamy texture.
Nutritional Information (Per Serving, Approximate)
- Calories: 250-300 (depending on the type of Oreos and cream cheese used)
- Fat: 15-20g
- Saturated Fat: 10-12g
- Cholesterol: 40-50mg
- Sodium: 100-150mg
- Carbohydrates: 25-30g
- Sugar: 15-20g
- Protein: 4-5g
Note: These values are estimates and may vary depending on specific ingredients used. For precise nutritional data, utilize a nutrition calculator with your exact ingredients.
Healthier Alternatives for the Recipe
For a slightly healthier version of these Mini Red Velvet Oreo Cheesecakes, consider these substitutions:
- Reduce Sugar: Use a sugar substitute like stevia or erythritol, reducing the amount of sugar by 25%. Start with a smaller reduction and adjust to your taste preference.
- Greek Yogurt: Substitute half of the cream cheese with plain nonfat Greek yogurt for a boost of protein and a decrease in fat.
- Whole Wheat Oreos: If available, use whole wheat Oreos for added fiber.
Serving Suggestions
These mini cheesecakes are perfect as they are! However, you can elevate them with:
- Fresh Berries: Garnish with fresh raspberries, strawberries, or blueberries for added color and a burst of freshness.
- Chocolate Shavings: A sprinkle of dark chocolate shavings adds elegance and complements the red velvet flavor.
- Whipped Cream: A dollop of lightly sweetened whipped cream adds a touch of indulgence.
- Miniature Oreo Pieces: Crumble mini Oreos on top for an extra textural element and visual appeal.
Let your creativity shine! Experiment with different garnishes to personalize the presentation.
Common Mistakes to Avoid
- Overbaking: Overbaking will result in dry, cracked cheesecakes. Ensure the centers are just slightly jiggly when you remove them from the oven.
- Not Chilling Sufficiently: Insufficient chilling time will lead to a soft, unstable cheesecake. Allow ample time for the cheesecakes to set completely in the refrigerator.
- Using Cold Cream Cheese: Make sure your cream cheese is softened to room temperature for optimal blending and a smooth, creamy texture.
Storing Tips for the Recipe
Store the Mini Red Velvet Oreo Cheesecakes in an airtight container in the refrigerator for up to 3 days. They are best enjoyed within the first two days for optimal texture and flavor. You can also freeze the baked and chilled cheesecakes for up to 2 months. Thaw overnight in the refrigerator before serving.
Conclusion
Making Mini Red Velvet Oreo Cheesecakes is a rewarding experience that will leave you with delicious individual treats perfect for every occasion. Remember, the key is to pay attention to detail, not overbake, and allow ample chilling time. Try this recipe today and impress your friends and family! Don’t forget to share your creations on social media and tag us! #MiniRedVelvetOreoCheesecakes #DessertPerfection #EasyRecipe
FAQs
Q: Can I use a different type of cookie for the crust? A: Absolutely! Chocolate graham crackers, digestive biscuits, or other chocolate sandwich cookies will work well. Just adjust the sweetness as needed depending on the cookie’s sugar content.
Q: Can I make these ahead of time? A: Yes! These cheesecakes are best made a day or two ahead of serving to allow them to fully chill and set.
Q: How do I know if they’re done baking? A: The edges should be set, and the centers should be just slightly jiggly. If you gently shake the muffin tin, the cheesecakes shouldn’t wobble excessively.
Q: Can I make a larger version of this recipe? A: Yes, you can easily scale up the recipe. Just remember to adjust the baking time accordingly. Consider using a 9-inch springform pan and increase the baking time, potentially up to 50-60 minutes, keeping an eye on it to prevent overbaking. You’ll need to adjust the baking time based on your oven and the size of the pan.
We hope you enjoy creating and savoring these Mini Red Velvet Oreo Cheesecakes! Let us know in the comments how yours turned out!